
Master the Art of Dipping Resin
Dipping resin is a fantastic way to create delicate, glass-like petals and shapes for your craft projects. However, many beginners find themselves struggling with resin that won't stick, bubbles that won't go away, or shapes that simply don't look right.
In this guide, you will learn the essential techniques to transition from frustrating failures to beautiful, professional-looking resin pieces. Whether you are struggling with wire thickness or wondering why your resin is repelling, these steps will help you master the craft.
Steps
Preparation is Key
Before you even open your resin pot, the success of your project depends on your preparation. Working with wire and resin requires patience and a clean workspace.
Choose the Right Wire
While many kits come with a very fine wire, beginners often find it easier to work with something slightly thicker. Thicker wire provides a more stable frame, making it much easier to achieve a consistent resin film until you have developed your "feel" for the material.
Clean Your Frames
One of the biggest reasons resin fails to adhere is invisible grease and oils from your hands. If you have been bending and shaping your wire, you have likely transferred oils onto the surface, which will repel the resin. Always wipe down your completed wire shapes with 99% isopropyl alcohol and let it evaporate completely before dipping.
How to Create Perfect Resin Petals
Creating a resin "window" across a wire frame is a delicate process. Follow these steps to ensure a smooth, even finish every time.
Shape Your Wire: Wrap your wire around a wooden blank or mandrel to create a consistent loop. Twist the ends together to secure the shape, then flatten the loop slightly to ensure the resin can span the gap easily.
The First Dip: Slowly submerge your wire frame into the resin. Ensure you dip deep enough to go past the "tie" where the wires meet.
The Slow Release: Lift the frame out very gently. This is the most critical part; if you move too fast, the resin film will pop. Hold it over the pot for a few seconds to let the excess residue drip off.
The Initial Cure: Turn on your UV lamp. If possible, use a double-sided lamp to cure from the top and bottom simultaneously. Rotate the piece slowly as it cures (like a rotisserie) for about one minute to prevent the resin from pooling on one side.
The Second Dip: Once the first layer is set, dip the piece again. This adds strength and a better surface for your colours. Cure this layer for another minute, but leave it slightly "tacky" (sticky) if you plan to add powders.
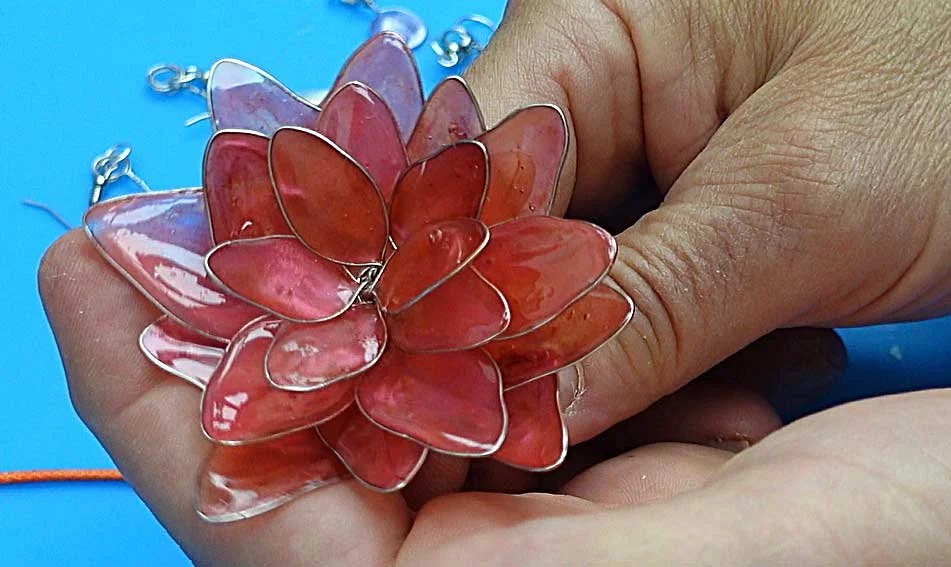
Add Colour: Using a soft brush, gently apply mica or chameleon powder to the tacky resin. This gives the petal a beautiful, iridescent sheen. Blow away any excess powder.
The Final Seal: Dip the coloured petal into the resin one last time to seal the powder. Let the excess run off slowly, then perform a final, full cure for three minutes to ensure everything is rock-hard and durable.
Tips
Batch Produce: It is more efficient to shape all your wire frames first, clean them all at once, and then move on to the dipping stage.
Patience is Vital: Dipping resin cannot be rushed. If you move too quickly during the dip or the extraction, you will end up with bubbles or a broken film.
Fixing Holes: If you notice a small hole in your resin film after the first cure, don't worry. Simply dip it again; the subsequent layers will often fill in small gaps.
Embrace Texture: If the resin pools slightly and creates a small lump, don't scrap the piece. In nature, flower petals have natural imperfections and textures that can make your work look more realistic.
Rotation: Always keep the piece moving slowly during the first minute of curing. This ensures the resin stays evenly distributed across the wire frame.
FAQs
Why does my resin keep pulling away from the wire?
This is usually caused by oils from your skin. Ensure you clean your wire thoroughly with 99% alcohol before dipping to remove any grease.
Can I use pre-coloured resins?
Yes, coloured dipping resins are available. However, using clear resin allows you more flexibility, as you can apply various mica powders or chameleon flakes to create custom gradients and effects.
How long should I cure the final piece?
For the final "sealing" coat, a full three-minute cure is recommended to ensure the piece is completely set and the surface is no longer tacky.
What if I'm using the very thin wire that came with my kit?
It is possible to use thin wire, but you must be even more careful. On the first dip with thin wire, try curing it for two minutes initially to ensure the delicate frame is fully supported by the hardened resin before the second dip.
Tools and Materials
📌 As an Amazon Associate, I earn from qualifying purchases:
(USA) Here is my amazon store for the USA
(UK) Here is my Amazon Store for the UK
Individual links below for the items used in this video:
LINKS FOR USA ONLY
(USA) Dipping Resin: https://teexpert-resin.com/en-gb/pages/uv-dip-resin?ref=dzQvIE4y 10% off Discount code: SteveTee
(USA) Amazon Dipping Resin: https://amzn.to/4lp2K8i
(USA) Wire: https://amzn.to/4bb7dH2
(USA) UV Lamp: https://amzn.to/4aT2xqx
(USA) Ribbon: https://amzn.to/40bi2UC
(USA) Sphere Mould: https://amzn.to/4rbT9mz
(USA) Teexpert Hand Cleaner: https://amzn.to/4uf3IrT
(USA) Display Light: https://amzn.to/46HiQnP
(USA) Chameleon Powder: https://amzn.to/46JhHw7
LINKS FOR UK ONLY
(UK) Dipping Resin: https://teexpert-resin.com/en-gb/pages/uv-dip-resin?ref=dzQvIE4y 10% off discount code: SteveTee
(UK) Amazon Dipping Resin: coming soon.
(UK) Wire: https://amzn.to/40hIZWJ
(UK) UV Lamp: https://amzn.to/4le4OzV
(UK) Ribbon: https://amzn.to/3N77zq8
(UK) Sphere Mould: https://amzn.to/4udhFGT
(UK) Teexpert Hand Cleaner: https://amzn.to/40iKN1F
(UK) Display Light: https://amzn.to/4rlGjCt
(UK) Chameleon Powder: https://amzn.to/4lmeAAk