Turn Inexpensive Shop Finds Into a Profitable Resin Jewellery Side Hustle
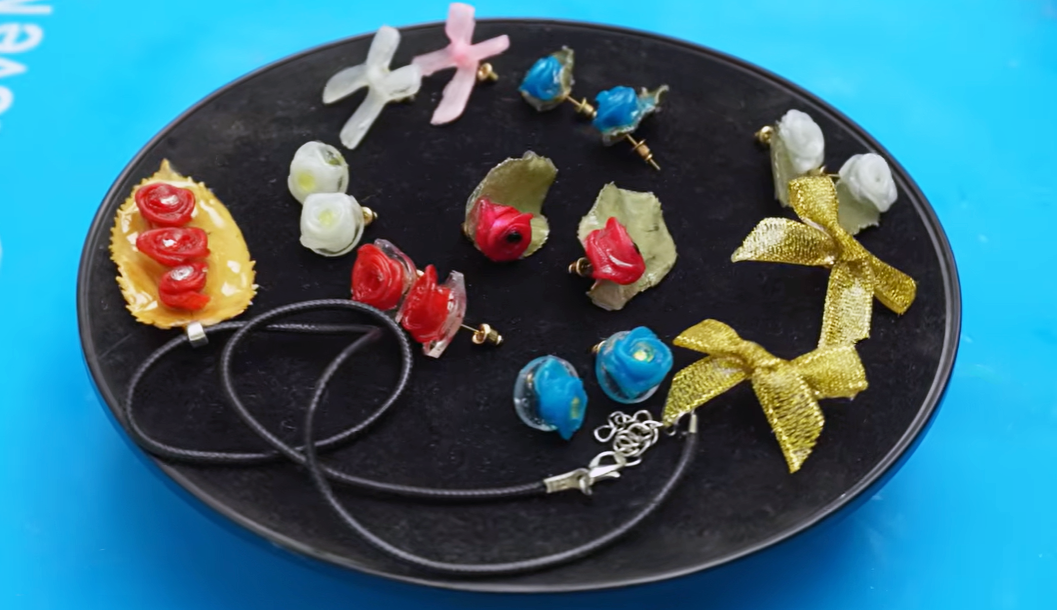
Have you ever walked through a budget shop, spotted beautiful miniature items, and wondered how you could turn them into something spectacular? Converting inexpensive fabric bows, silk roses, and dried leaves into high-quality, glossy jewellery is easier than you think.
In this guide, you will learn how to preserve and transform these delicate materials using UV dipping resin. Whether you want to expand your crafting hobbies or start a profitable side hustle, this step-by-step process will show you how to create lightweight, stunning earrings and pendants that look professional and sell well.
The Ultimate 'How-to' Guide for UV Resin Dipping
Making dipped resin jewellery is a fantastic project for hobbyist crafters. The secret lies in using a specialized UV dipping resin. Unlike standard UV resin, dipping resin has the perfect thickness and stickiness to cling to uneven textures, fabrics, and fragile botanical items without running off completely.
This technique creates a durable, glass-like coating that preserves the intricate details of silk petals, fabric ribbons, and real leaves. By sealing these lightweight materials in resin, you can create gorgeous, wearable art that costs mere pennies to make but commands a fantastic price at craft fairs or online shops.
Steps
Step 1: Prepare Your Materials and Molds
Gather your dried leaves, fabric bows, and miniature roses. If you are using a silicone mold to create flat backs for your roses, ensure it is clean. If your small mold has built-in silicone tabs meant for creating bead holes, push the mold cups up from underneath and carefully clip the tabs off with scissors to achieve a solid, flat backing.
Step 2: Dipping the Fabric Roses and Creating Backs
Slowly submerge a miniature silk rose into your UV dipping resin. Lift it out gently and let the excess resin drain back into the pot.
Place the dipped rose directly into your small round silicone mold cup. As the resin naturally seeps off the rose, it will pool slightly in the bottom of the mold, forming a perfectly smooth, flat base for your earring backings.
Step 3: Add Embellishments and Let the Resin Soak
If you want to add a bit of sparkle, use tweezers to place a small coloured gem directly into the centre of each dipped rose. Before curing, allow the rose to sit in the mould for a minute. This gives the resin time to fully soak into the fabric fibres, which locks in the crisp definition of the petals.
Step 4: Dipping the Bows
Submerge your fabric bows into the dipping resin. Because fabric holds a lot of fluid, let the excess drip away patiently.
To prevent messy pooling, press the bow down onto a clean spot on your silicone mat, pick it up, and move it to a second, dry area on the mat. Use a baby wipe to quickly clean up any excess resin left behind on the first spot. Ensure the bow is shaped nicely before curing.
Step 5: Execute the First Cure
Place your resin-soaked roses (in their mold) and fabric bows into a double-sided UV lamp. Set the timer for 300 seconds (5 minutes) to guarantee they are completely cured through to the core.
Step 6: Coating Fragile Dried Leaves
Gently submerge crispy, dry leaves into the resin. Hold them over the pot to drain fully. Lay them on your silicone mat.
If any air bubbles appear on the surface of the leaf, pop them gently. You can quickly pass a flame over the bubble to burst it, but be incredibly careful as dry leaves are highly flammable. Cure the top side under your UV lamp, then turn them upside down to cure the reverse side.
Step 7: Trimming and Applying a Second Coat
Inspect your cured items. If any paper-thin resin lips or sharp edges have formed around the boundaries of the leaves or bows, snip them away with scissors.
Give your leaves and larger bows a second dip in the resin. A second coat rounds off sharp corners and makes the finished pieces robust and durable. Cure them fully under the lamp once more.
Step 8: Attach the Earring Backs
Mix equal parts of a 5-minute epoxy glue (Part A and Part B). Using tweezers, dip the flat pad of an earring stud backing slightly into the mixed epoxy. Press the backing firmly onto the flat center base of your cured bows, leaves, or rose molds.
Allow the epoxy glue to set up completely. While it is called a 5-minute epoxy, it generally takes about 10 minutes to dry perfectly clear and permanent.
Tips
Patience is Key: Always let the excess dipping resin fully drain off your components before placing them down. Over-flooding your pieces fills in the gaps, making you lose the beautiful definition of the petals and ribbons.
Keep it Clean: Resin residue left on silicone mats can transfer to your next piece. Always move your dipped items to a clean area of your mat before curing.
Double-Dip for Safety: Larger bows with pointed tips can become sharp after a single coat of resin. A second dip rounds out the edges, making them comfortable against the skin.
Glue Choices Matter: Always use a 5-minute two-part epoxy to secure jewellery findings. It forms a much stronger, more permanent bond with cured resin than standard craft glues.
Clean Your Gloves: If you accidentally get sticky epoxy or resin on your gloves while working, wash them immediately with specialized resin hand cleaner to prevent smudging your beautiful finished pieces.
FAQs
Why should I use UV dipping resin instead of normal UV resin?
UV dipping resin is formulated with a higher viscosity, meaning it is thicker and stickier than standard UV resin. This allows it to cling evenly to fabrics, silk, and organic structures, creating a smooth, protective shell without dripping off too quickly.
Can I use fresh leaves for this jewellery project?
It is best to use completely dried leaves. Fresh leaves contain moisture which can react poorly with resin over time, leading to rotting or discolouration inside the cured shell. Ensure your botanicals are crispy and dry before starting.
How do I prevent fabric items from losing their shape?
After dipping fabric bows or silk flowers, let them sit for a minute before putting them under the UV lamp. Letting the resin soak into the fabric helps the material retain its natural texture and crisp lines once it cures.
Are these resin earrings heavy to wear?
Not at all! One of the best features of this style of jewellery is that the core materials are fabric and dried leaves. Even after being coated in a glass-like layer of resin, the finished earrings remain incredibly lightweight and comfortable for all-day wear.
Tools and Materials
📌 As an Amazon Associate, I earn from qualifying purchases:

LINKS FOR USA ONLY
(USA) Dipping Resin: https://amzn.to/4dpPgY6 Discount Code: STEVE40OFF combine it with any amazon page discount,
(USA) Dipping Resin Website: https://teexpert-resin.com/en-gb/pages/uv-dip-resin?ref=dzQvIE4y combine it with any website page discount,
(USA) UV Lamp: https://amzn.to/4dqexBt
(USA) Craft Roses: https://amzn.to/47XJHgb
(USA) Craft Bows: https://amzn.to/47Bxmhk
(USA) Dried Flowers: https://amzn.to/4toJxXo
(USA) Earring Mould: https://amzn.to/3NIHWwp
(USA) Earring Studs: https://amzn.to/4saOoKy
(USA) 5 Min Epoxy: https://amzn.to/48mUKiO

LINKS FOR UK ONLY
(UK) Dipping Resin: Coming Soon
(UK) UV Lamp: https://amzn.to/41u1Ka9
(UK) Craft Roses: https://amzn.to/41G8Zvt
(UK) Craft Bows: https://amzn.to/4cmgU7i
(UK) Dried Flowers: https://amzn.to/4e4BdY6
(UK) Earring Mould: https://amzn.to/4m6oeY5
(UK) Earring Studs: https://amzn.to/4c174GO
(UK) 5 Min Epoxy: https://amzn.to/4s3hPOB